Barcode-Based Asset Management with ServiceDesk Plus & AssetExplorer
Barcode-Based Asset Management with ServiceDesk Plus & AssetExplorer
The barcode management feature included in ManageEngine ServiceDesk Plus and ManageEngine AssetExplorer enables fast, accurate, and traceable asset management.
With this structure:
- Assets are quickly added to the system.
- Stock and location information is tracked.
- All inventory can be monitored in real-time.
In addition, mobile application support ensures effective use in the field.
This document covers the following topics:
- Barcode Generation and Usage Scenarios
- Methods of Creating Barcodes
2.1 Adding Assets with Vendor Barcode
2.2 Creating Custom Barcodes for the Institution
2.3 Creating Barcodes for Existing Assets
2.3.1 Creating Barcodes Using Asset Data - Usage via Mobile Application
- Preventing Duplicate Entries
- Necessary Settings for Barcode Printing
5.1 Browser Settings
5.2 Printer Settings - Setting Barcode Values and Their Appearance in Inventory
- Conclusion
1. Barcode Generation and Usage Scenarios
In the inventory area:
- Manually added
- Integration (e.g., Endpoint Central) included
Barcodes can be generated for all assets.
Newly acquired devices:
- With the seller's barcode
- With a company-specific barcode
By being integrated into the system, the asset can be tracked as soon as it enters the environment.
Scan your assets' barcode/QR code/RFID to retrieve existing asset information or add new assets to the application.
Note: Currently, only Zebra RFID readers are supported.
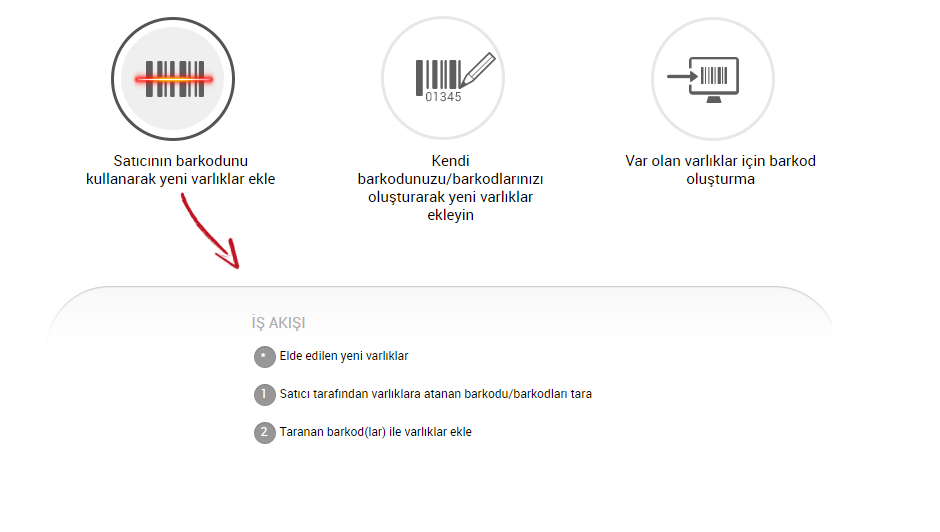
2. Barcode Generation Methods
The barcode generation screen offers three options tailored to your specific purpose.
1. Adding new assets using the vendor's barcode.
2. Adding new assets by creating your own barcode.
3. Creating barcodes for existing assets.
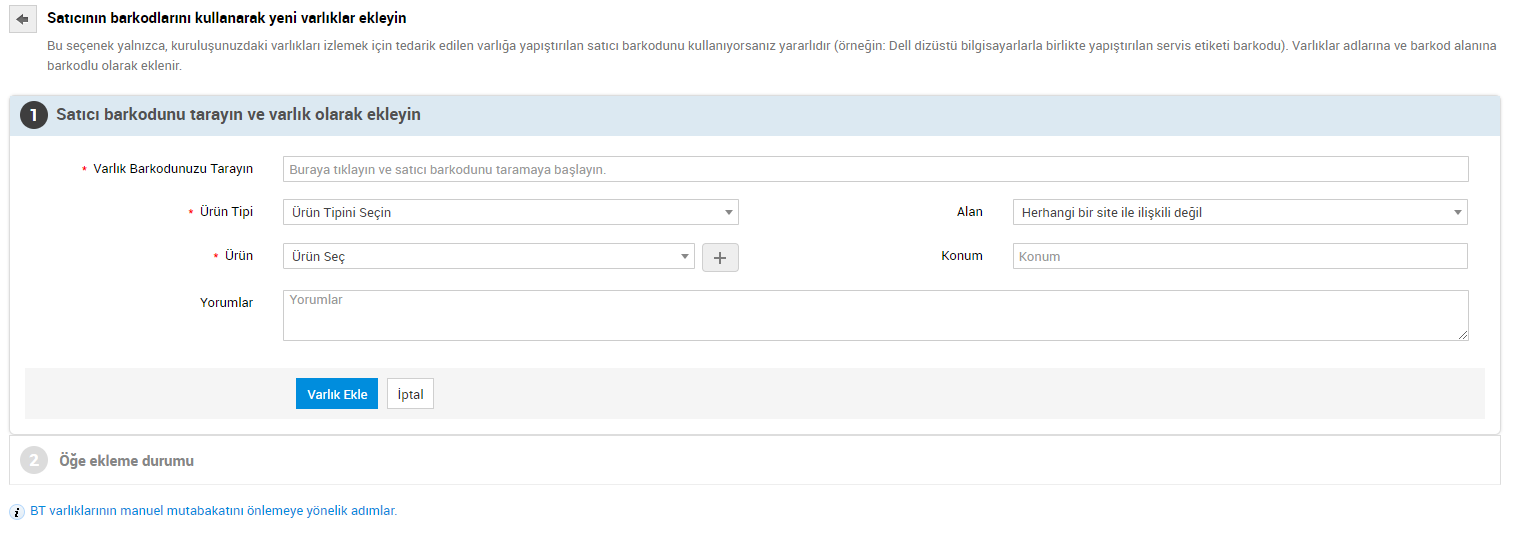
2.1 Adding Assets with Vendor Barcode
Workstations, routers, printers, and similar devices can be added directly to the system using their manufacturer barcodes.
Example:
- Service Tag on Dell devices
APPLICATION:
- Make sure the barcode scanner is active.
- Click on the "Scan Asset Barcode" field.
- Scan the barcode.
2.2 Creating a Custom Barcode for Your Organization
A custom barcode system can be created for inventory items, specific to the organization.
- Product type is selected.
- The relevant group/department is identified.
- A barcode generation method is selected.
Methods:
- Sequential
- Manual (by hand)
Sequential example:
- Starting point: 150
- Quantity: 25
- Prefix: LAP
- Suffix: CA
The barcodes generated:
LAP150CA, LAP151CA ... LAP174CA
Note: The counter will automatically increment depending on the product type.
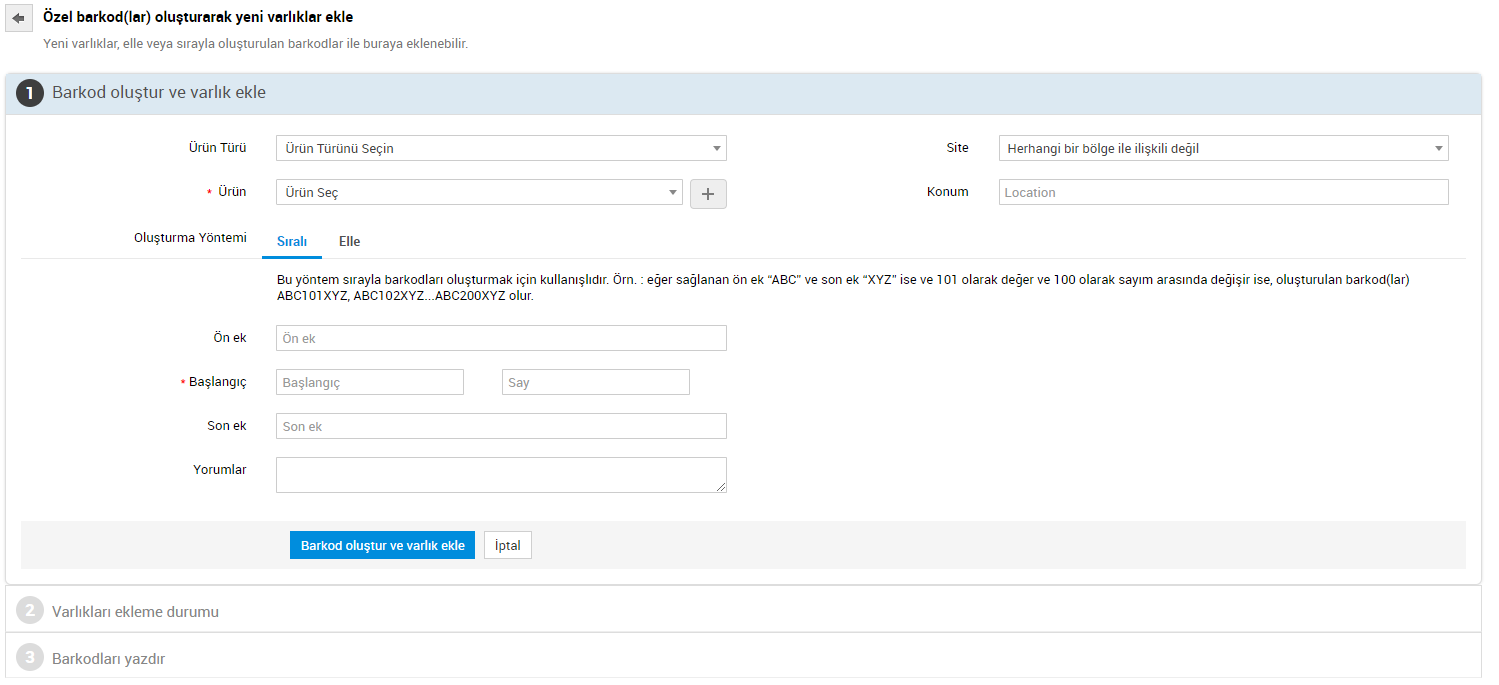
In the next stage, products are added to the Asset list along with their barcode names, and the system becomes ready to print barcodes.
If you want to print the barcode later, you can select the "Print Later" option.
Note: Since this method creates newly added inventory with a barcode name, it is important to check the "Preventing Duplicate Records" content in step 6 to avoid duplicate records after SDP scanning.
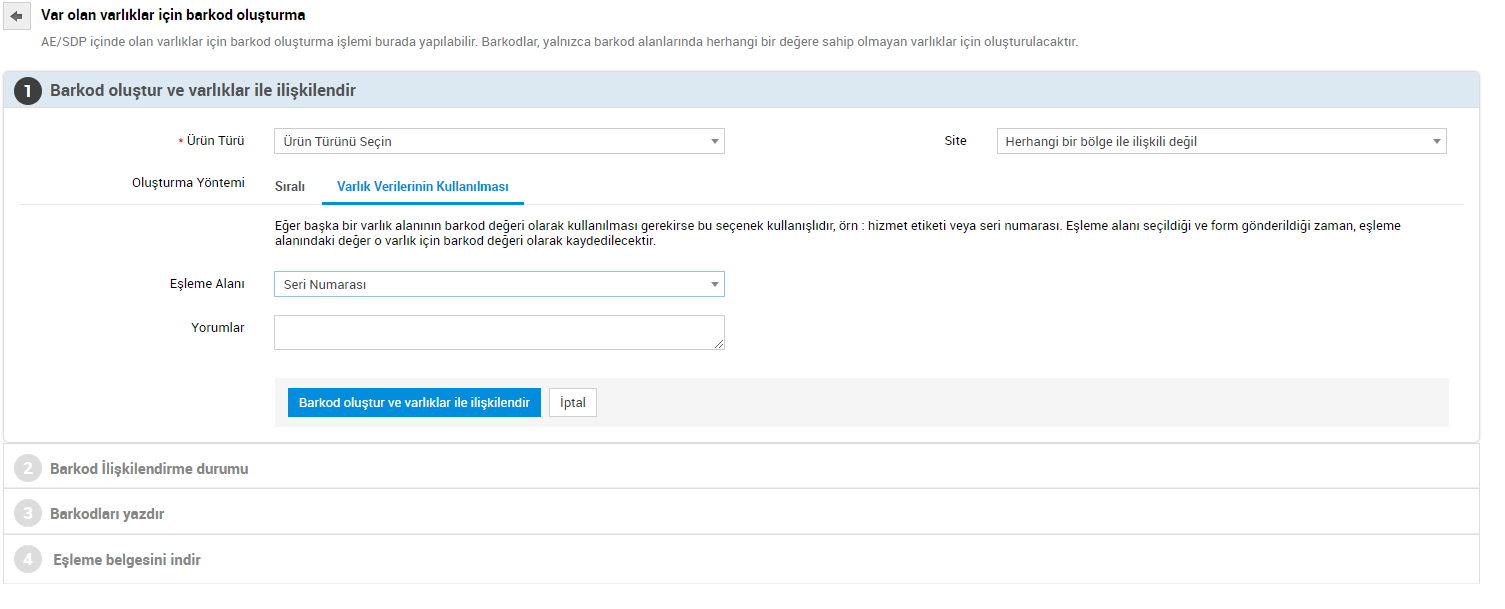
2.3 Creating Barcodes for Existing Assets
This option can be used to generate barcodes for existing assets.
Important:
Before processing, ensure the barcode field of the assets is blank.
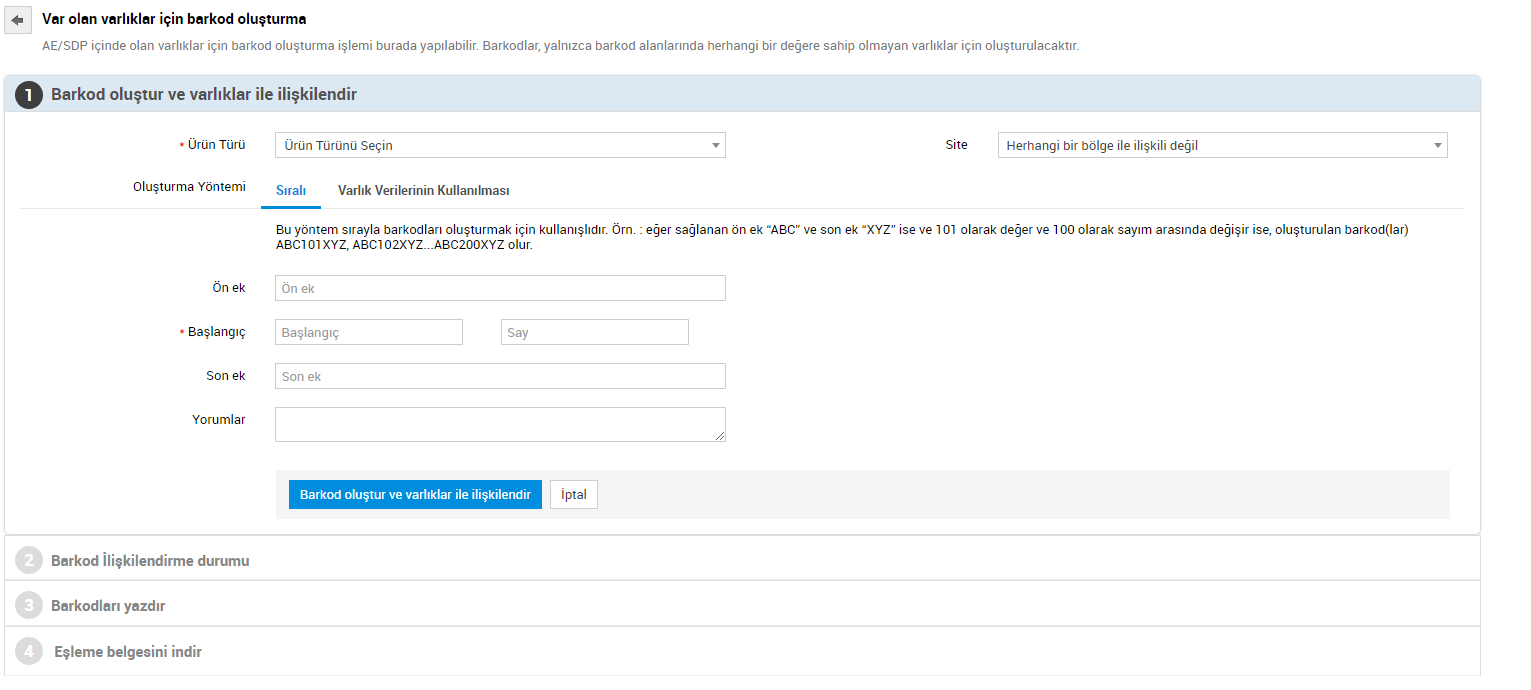
2.3.1 Creating Barcodes Using Asset Data
When generating barcodes for existing assets, this option allows you to use an existing field as the barcode value.
Examples of fields:
- Service label
- Serial number
Steps:
- The matching area is selected.
- The relevant data is assigned as a barcode.
- “Generate and associate barcode” is selected.
3. Usage via Mobile Application
With the ManageEngine ServiceDesk Plus mobile app :
- Barcodes can be scanned without the need for additional equipment.
- Asset additions and updates can be made.
Entrance:
You can now track ServiceDesk support and asset management from the app. Access the mobile app: Barcode scanning via the application;
Inventory details displayed after scanning;
4. Preventing Duplicate Entries
Assets added via barcode may initially be created with the barcode name. If the device is rediscovered by its DNS name once it joins the network, this can lead to duplicate records.
To prevent this:
- Search the system before using the device.
- Enter asset details.
- Update the name field using "Edit".
Example:
LAP000101 → mark.abc.com
- Next, conduct an inventory scan.
5. Settings for Barcode Printing
Before printing barcodes, the scanner and printer settings must be defined as follows.
5.1 Browser Settings
- Margins: 0
- Header/Footer: empty
5.2 Printer Settings
- The label height must be adjusted correctly.
- “Always use driver settings” should be selected.
6. Barcode Value Settings and Viewing
You can view the generated barcode in the Barcode field within the relevant inventory details, and you can print it if you wish.
Once the necessary settings for the barcode are complete, the barcode output is ready to be printed. You can now print your barcode.
7. Conclusion
Barcode management is a key feature in ServiceDesk Plus and AssetExplorer that accelerates and standardizes asset management.
In this way:
- Inventory accuracy increases.
- Operational processes are accelerated.
- The need for manual intervention is reduced.
- Audit processes become easier.
If you have any questions or support requests regarding the relevant steps, you can contact us via email at support@wotech.com.tr .
Related Articles
How to Change URL in Asset Explorer? (Step by Step Guide)
? Purpose: Manually update the URL of the Asset Explorer application. ? Steps: Find out PostgreSQL password: Open the command prompt (CMD) with administrator rights. Navigate to the following directory: Drive:\ManageEngine\AssetExplorer\bin Run the ...Servicedesk Plus - Criteria for Determining Uniqueness of Workstations in Inventory Scanning
Criteria for Determining the Uniqueness of Workstations in Servicedesk Plus Scanning ServiceDesk Plus uses the following criteria to determine the uniqueness of workstations during the scanning process: Service Tag Workstation Name Thanks to these ...SDP & Jira Integration Document: Technical Installation Guide
SDP → Jira Cloud Integration Setup Guide Contents ? Overview 1. Overview & Architecture 2. Network / Firewall 3. Jira Preparation 3.1 API Token 3.2 Base64 String 3.3 Finding Field ID 3.4 Postman Test 4. Callback Function 4.1 Creation 4.2 Deluge ...Servicedesk Plus - Text and Logo Editing in Browser Tab
This article includes steps on how to edit the icon and text appearance in the browser tab of ServiceDesk Plus. Note: The following test procedure was implemented in Servicedesk Plus version 14930. Note: It is recommended that you take a snapshot of ...ServiceDesk Plus - Query for Service Catalog and Category Export
This document is available on ManageEngine ServiceDesk Plus : Export Service Catalog Exporting the Category/Subcategory/Item structure It is designed for users who want to carry out their transactions. * The relevant queries are compatible with the ...