ServiceDesk Plus - Creating User List Additional Field in Request Form
When opening or editing a request, there may be times when we need to enter user information (name/surname) in addition to requester and technician information. Such situations may cause us to write incomplete or incorrect name and surname information of users.
As a solution to this situation, when you open a request, you can search or search for users instead of typing them manually, as we will prepare below, and thus avoid such confusion.
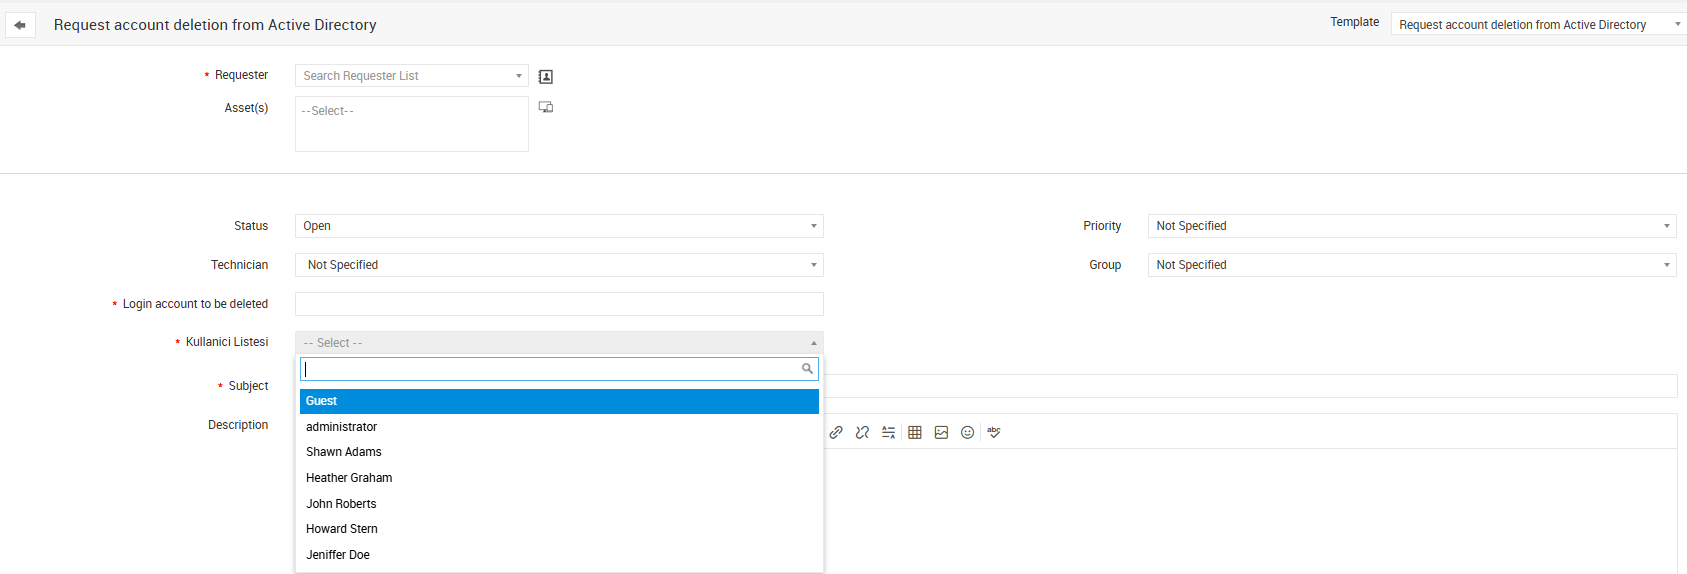
After the steps to be applied, we will have created an additional field for the user list where you can select or search, as you can see in the screenshot below.
Application Steps:
First of all, you need to decide whether you want to use this field in all templates. Because even though the additional field we will create can be used in all templates, the relevant rule can be configured for all templates or specifically for each template.
This document will walk you through the steps for all Service Templates.
1- Log in to your Servicedesk Plus portal with your Admin user. Then let's start by creating the additional field that we will use as the User List and adding this field to a template.
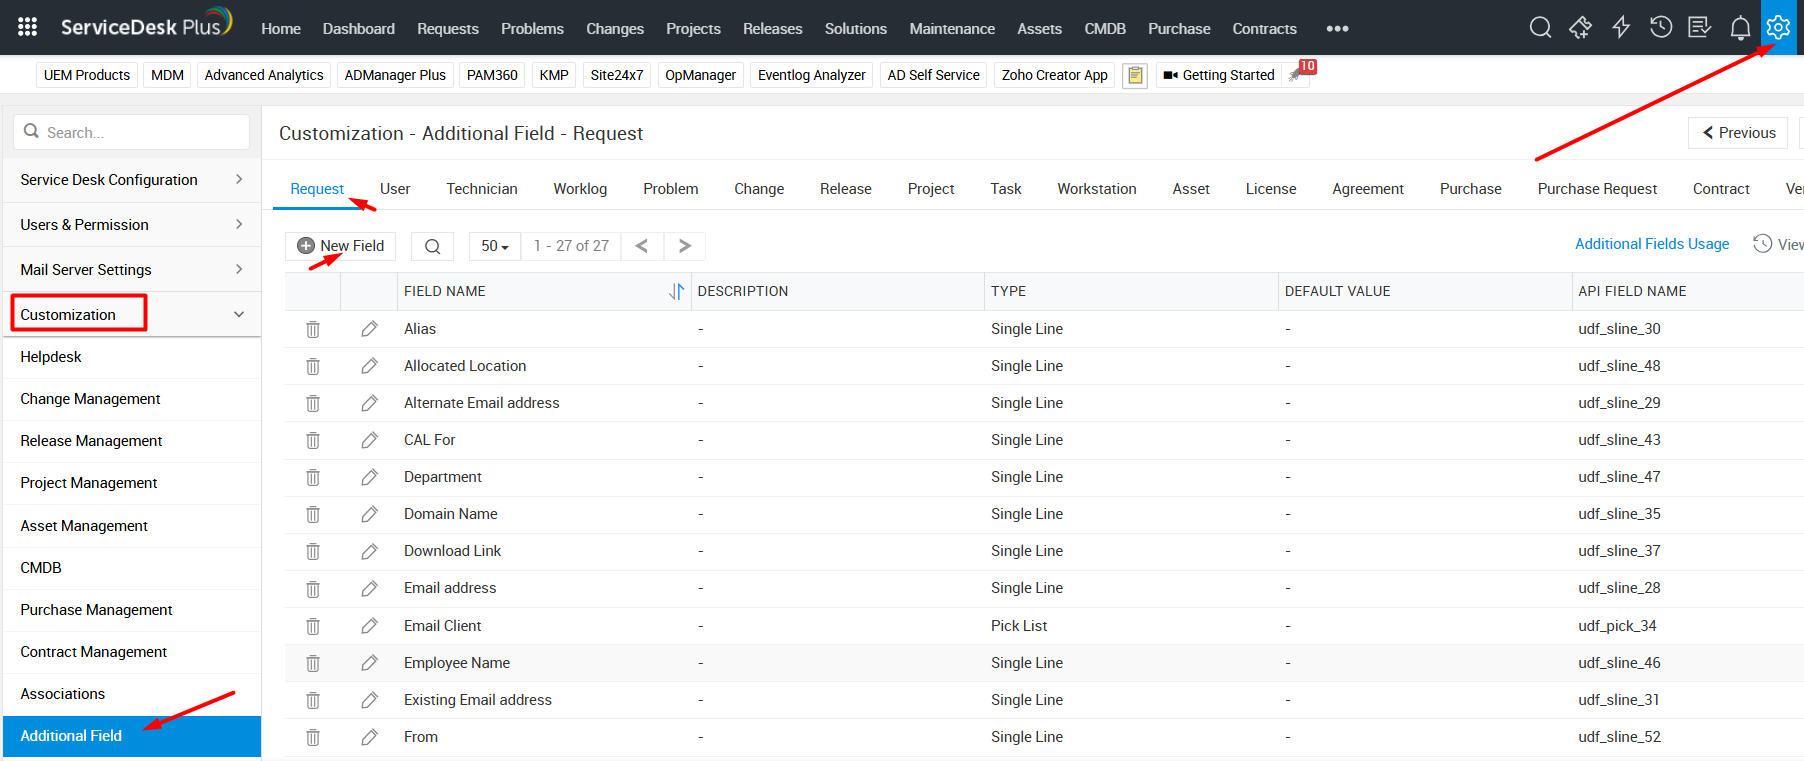
Let's follow the path Admin > Customization > Additional Field (Request) and create a field (Single Line) by clicking New Field .
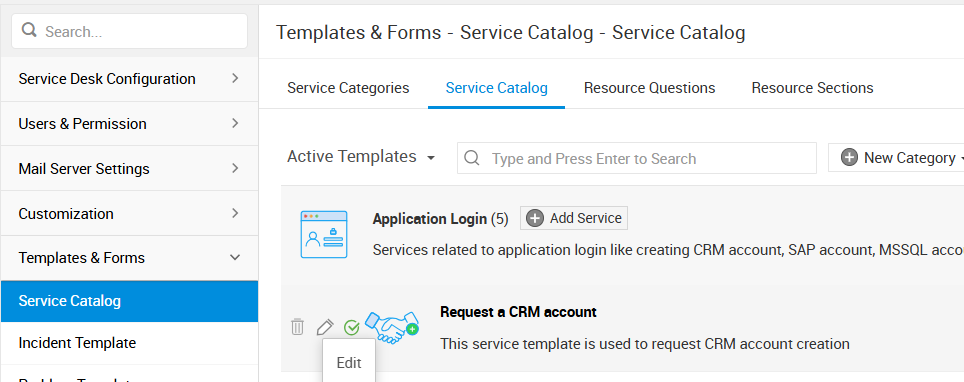
Afterwards, in order to add this field that we created to our templates, let's follow the path Admin > Templates & Forms > Service Catalog > Service Catalog and edit a template.
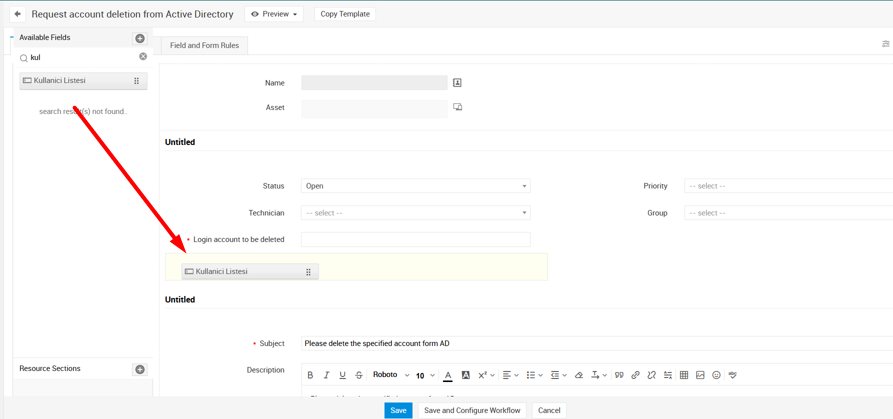
Let's search for the field we created in the Available Fields section, then drag it into the template and save it.
(At this stage, users will not be able to see this field since we only added it to the Technician fields)
2- In this step, we will create a rule for the field we created.
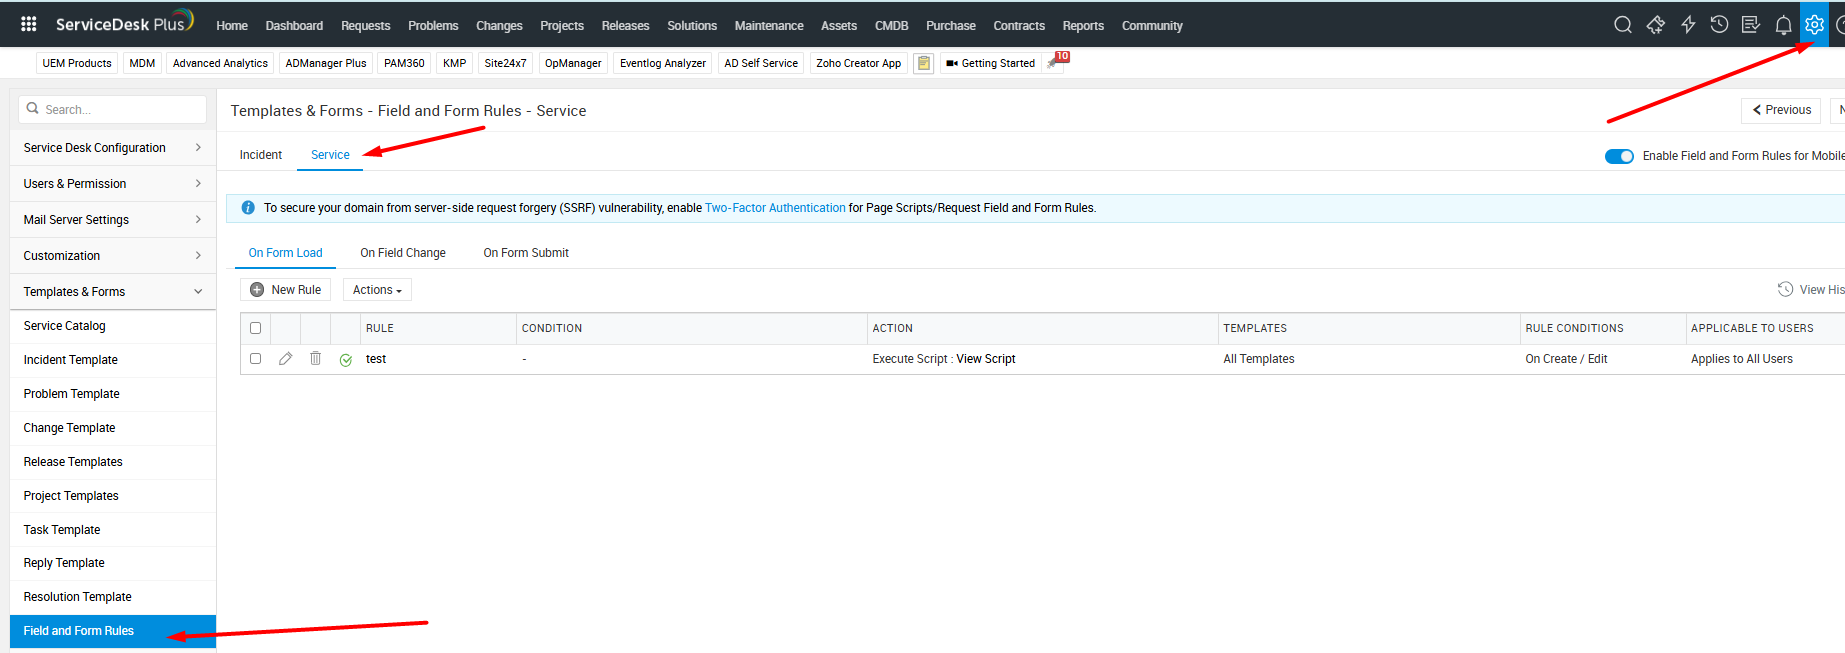
Then let's follow the path Admin> Template & Forms> Service . You can follow the screenshot below.
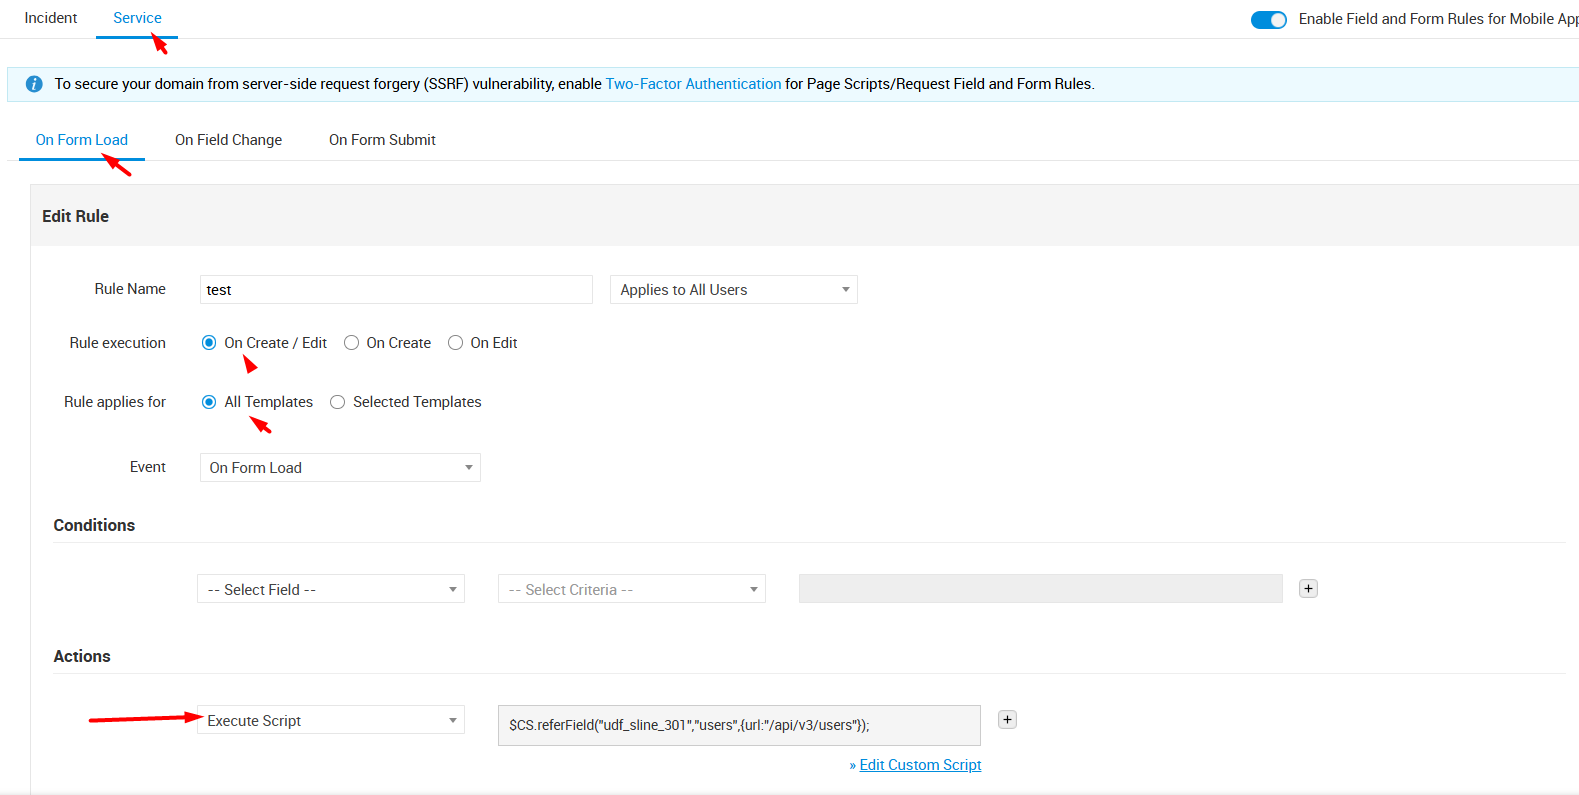
3- Click on New Rule to create a new rule. You can fill in the relevant fields for the relevant rule according to the screenshot I have provided below.
Let's select Execute Script in the Action section and click Write Custom Script on the right. In this area, we will add and edit our script as I will show in the next step.
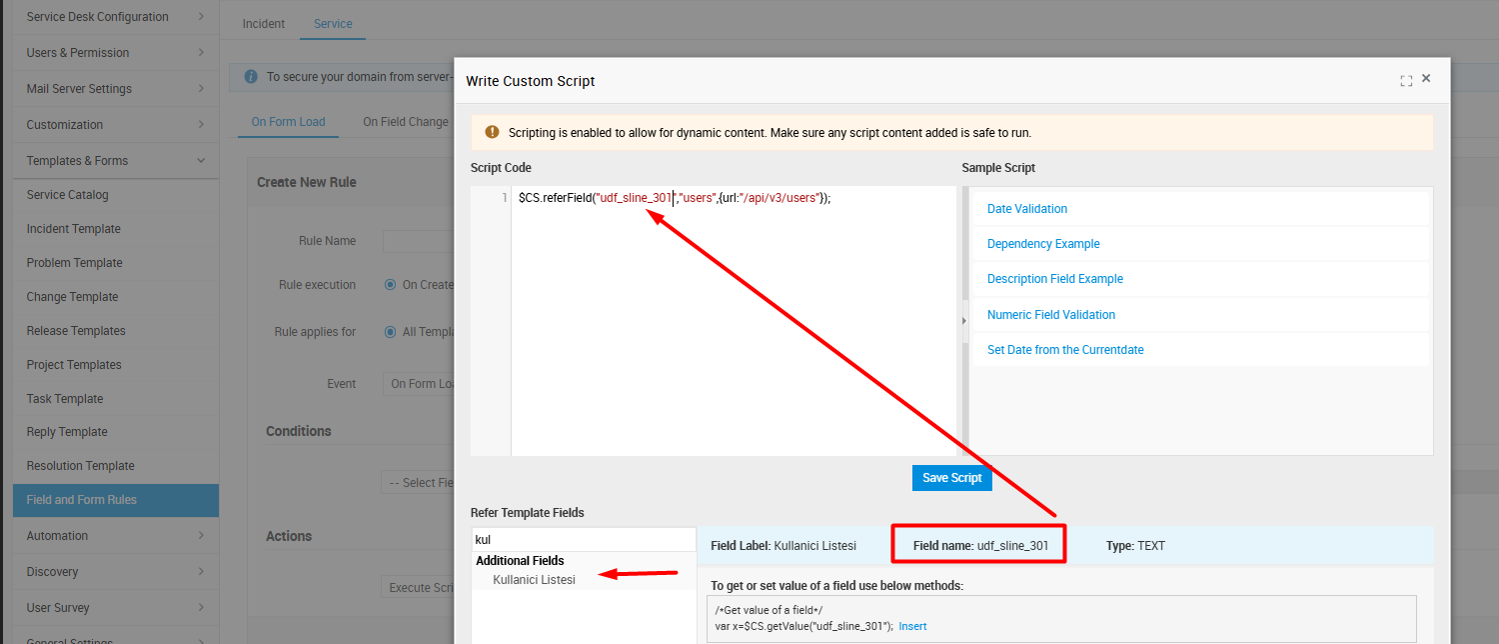
Paste the following content into the script field, You need to edit the content of the WorkOrder_Fields_UDF_CHAR10 information according to your own field name. You can see how to determine it in the screenshot below.
Script:
$CS.referField(" WorkOrder_Fields_UDF_CHAR10 ","users",{url:"/api/v3/users"});
Important: WorkOrder_Fields_UDF_CHAR10 information will vary depending on the field you create. You need to obtain this field information and edit this script according to the screenshot below.
4- After editing and saving the script, you can save this rule. Now you can try to open a request with the template you added this field to and do a test.
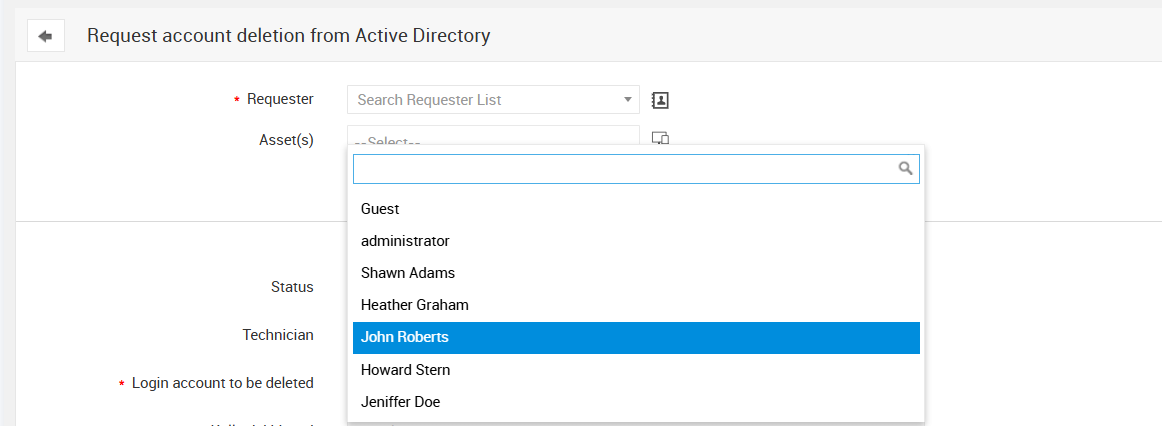
After the steps, when you open a request with this field or if the user opens a request with this field and you edit it, you will be able to see the user list.
If you need support regarding the steps or the note content below, please contact us at destek@wotech.com.tr .
NOTES:
The user list created with this configuration will only work for technicians.
In order for non-technical users to use this user list area (the content will appear incorrectly for them), API permissions must be defined for users via the database.
update globalconfig set paramvalue='true' where parameter = 'AllowUserAPIInRequesterLogin';
Since this query must be performed by connecting to the DB, I would like to ask you to send an e-mail to our support e-mail address destek@wotech.com.tr for DB access .
As a solution to this situation, when you open a request, you can search or search for users instead of typing them manually, as we will prepare below, and thus avoid such confusion.
After the steps to be applied, we will have created an additional field for the user list where you can select or search, as you can see in the screenshot below.
Application Steps:
First of all, you need to decide whether you want to use this field in all templates. Because even though the additional field we will create can be used in all templates, the relevant rule can be configured for all templates or specifically for each template.
This document will walk you through the steps for all Service Templates.
1- Log in to your Servicedesk Plus portal with your Admin user. Then let's start by creating the additional field that we will use as the User List and adding this field to a template.
Let's follow the path Admin > Customization > Additional Field (Request) and create a field (Single Line) by clicking New Field .
Afterwards, in order to add this field that we created to our templates, let's follow the path Admin > Templates & Forms > Service Catalog > Service Catalog and edit a template.
Let's search for the field we created in the Available Fields section, then drag it into the template and save it.
(At this stage, users will not be able to see this field since we only added it to the Technician fields)
2- In this step, we will create a rule for the field we created.
Then let's follow the path Admin> Template & Forms> Service . You can follow the screenshot below.
3- Click on New Rule to create a new rule. You can fill in the relevant fields for the relevant rule according to the screenshot I have provided below.
Let's select Execute Script in the Action section and click Write Custom Script on the right. In this area, we will add and edit our script as I will show in the next step.
Paste the following content into the script field, You need to edit the content of the WorkOrder_Fields_UDF_CHAR10 information according to your own field name. You can see how to determine it in the screenshot below.
Script:
$CS.referField(" WorkOrder_Fields_UDF_CHAR10 ","users",{url:"/api/v3/users"});
Important: WorkOrder_Fields_UDF_CHAR10 information will vary depending on the field you create. You need to obtain this field information and edit this script according to the screenshot below.
4- After editing and saving the script, you can save this rule. Now you can try to open a request with the template you added this field to and do a test.
After the steps, when you open a request with this field or if the user opens a request with this field and you edit it, you will be able to see the user list.
If you need support regarding the steps or the note content below, please contact us at destek@wotech.com.tr .
NOTES:
The user list created with this configuration will only work for technicians.
In order for non-technical users to use this user list area (the content will appear incorrectly for them), API permissions must be defined for users via the database.
update globalconfig set paramvalue='true' where parameter = 'AllowUserAPIInRequesterLogin';
Since this query must be performed by connecting to the DB, I would like to ask you to send an e-mail to our support e-mail address destek@wotech.com.tr for DB access .
Related Articles
SDP & Jira Integration Document: Technical Installation Guide
SDP → Jira Cloud Integration Setup Guide Contents ? Overview 1. Overview & Architecture 2. Network / Firewall 3. Jira Preparation 3.1 API Token 3.2 Base64 String 3.3 Finding Field ID 3.4 Postman Test 4. Callback Function 4.1 Creation 4.2 Deluge ...Barcode-Based Asset Management with ServiceDesk Plus & AssetExplorer
Barcode-Based Asset Management with ServiceDesk Plus & AssetExplorer The barcode management feature included in ManageEngine ServiceDesk Plus and ManageEngine AssetExplorer enables fast, accurate, and traceable asset management. With this structure: ...Password Manager Pro – Reporting of Manually Created Users and Last Login Dates
? Request Summary A list of users created manually (Add Manually) under the Users menu in Password Manager Pro (PMP) is needed. This list, in particular: Clearly distinguishes between manually generated users. Includes the user's last logon date. It ...OpManager Request List
WOTECH Information Technologies ManageEngine OpManager Pre-Installation Preparations (Expectations from the Customer) A) The document Purpose: It was created to convey the expected requirements from the customer during the implementation of the ...ServiceDesk Plus – Configure Technician to See Only Requests on Their Site
Scenario Let's say you have a branch or department in a different location or country. In such a scenario, you may want to integrate this branch or department into your existing Servicedesk Plus structure. However, you will need to create a separate ...